Add Jquery script
- Copy and paste the below code before

Step 3:
- Copy the below code inside
or Change can the RED highlighted text with url image url that you want,else leave it default(needn't change)
Change the BLUE highlighted text with your feed URL or place your advertisementYou are done..! If any problem persists please do comment.
- Save the Template
Saturday, March 3, 2012
Change Animated favicon to Blogger blog
Changing the favicon of your blog is a simple trick.By default blogger puts the blogger orange color logo to favicon.This can change to your blog logo.
Favicon appears next to the URL or title in the browser.If you have a logo of your blog then you can simply upload to blogger.Else there are many sites providing free favicon generator.See Netoops blog favicon on the top your browser.
Follow the instructions below.
- Go to Design->Page Elements
- You can see a small bar with blogger icon and a link EDIT click it.
- Then select your blog's logo by clicking Browse and click on Save.
Insert Animated Favicon
You can also insert Animated gif favicon.
- Go to Favicon Generator
- Upload your blog's logo and give scrolling text then click Generate favicon
It will generate your animated favicon,right click on the icon shows there and Save it.Then upload to root of website or upload to free image uploading sites like tinypic you will get the link to image from there.
- Go to Design->Edit HTML
- Copy the following inside
If any problem with this please inform via comment.Feel free to ask.
- Then click save.
Monday, February 27, 2012
Link Nudge using css3 and jquery blogger widget
This is a Simple Link nudge Effect tutorial.You can add this to links in your Blog.While Mouse over the link a simple animation works.This can be done through two methods.You can use any one of these.Live Demo of Link nudge is following
- Through CSS3 .
- With jQuery Effect.
Live Demo of Link nudge is followingLink Nudge Using CSS3
- Go to Blogger Account
- Design -> Edit HTML
- Find ]]> and copy the below code BEFORE it
.noopln {
-moz-transition: all 0.1s ease-in 0s ;
-webkit-transition: all 0.1s ease-in 0s ;
-o-transition: all 0.1s ease-in 0s ;
}
.noopln:hover {
margin-left: 12px;
}
- Save it.
- If you want link nudge effect to a link add class noopln to each link
Eg: BloggerIf you want this Link Nudge Effect to labels follow the steps below
- Go to Design->Edit HTML
- Find and copy the following code BEFORE it
.noopln,Label li,#Label1 ul li a,.Label li a {
-moz-transition: all 0.2s ease-in 0s ;
-webkit-transition: all 0.2s ease-in 0s ;
-o-transition: all 0.2s ease-in 0s ;
}
.noopln:hover,Label li:hover,#Label1 ul li a:hover,.Label li a:hover {
margin-left: 14px;
}
- That's all the Link Nudge with CSS3
Link Nudge using jQuery
Step 1: Add jQuery plugin (if your blog have a jquery plugin,ignore this step)You can put link nudge effect to a link by adding a class noopln
- Save it
Eg: Your LinkIf your link already have a class then add this class after a space.
Eg: Your LinkThe above jQuery code snippet is also work with your Labels,If you don't need Link Nudge effect to your labels then delete the red blinking highlighted code in it.And Save the TemplateIts almost finished,If you enjoyed this article share and like us.
Check out more Blogger Tips and Spice your blog tipsMonday, February 20, 2012
Dynamic Views Button with jquery Effect for Blogger Blog
Here is a Simple Tip to Set a Button for Changing the Blog View to Dynamic Views.I added Smooth jquery Hover Effect to Button.You can set any template to your Blogger Blog.If you add this Button to your Blog.It lets your Blog visitors to View Blog in Dynamic Views when they Click this Button.Add Dynamic Views Button to Blog
Make sure you had Backed up your Template before editing Template.(How to Backup Template)
Step 1.Add jQuery Plugin( If your Blog already have a jQuery plugin ignore this Step ),
- Go to Design -> Edit HTML
Step 2: Add Dynamic view button,
- Go to Design-> Page Elements
- Click on Add Gadget ,Select HTML/Javascript from it
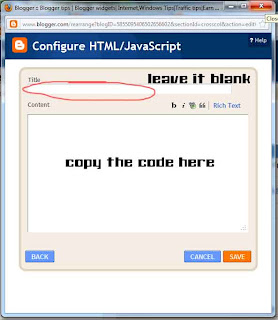
- Leave Title as blank, Copy the below code inside content section.
Click this for change the view to Dynamic views
I hope you enjoyed this article,if so please share n like us.
- Then Save it.
- That's all,you are done..
Sunday, February 19, 2012
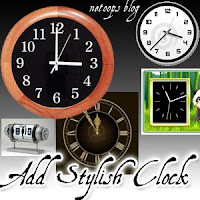
Stylish Static animated Flash Clock for Blogger
Here I am saying about How to Add a Stylish Flash Animated Clock to your Blogger Blog.Here is a huge collection of Clock widgets for your taste.Follow the Simple Steps below to make your Blog Stylish,Cool, and Smart looking Blog.
- First of all SignIn to your Blogger Account
- Select Design->Page Elements
- Click on Add Gadget
- Select HTML/javascript from it,then copy the code of clock you want.
Step 1: If you want a NON Static Clock Widget,then Just copy and paste the code to HTML/javascript content.
If you want a cool static clock,then first do the step above and Click HEREAdd Stylish Flash Clock 1
- If you want to add this Clock,then Copy and paste the below code
Add Stylish Flash Clock 2
- If you want to add this Clock,then Copy and paste the below code
Add Stylish Flash Clock 3
- If you want to add this Clock,then Copy and paste the below code
Add Stylish Flash Clock4
- If you want to add this Clock,then Copy and paste the below code
Add Stylish Flash Clock4
- If you want to add this Clock,then Copy and paste the below code
Add Stylish Flash Clock5
- If you want to add this Clock,then Copy and paste the below code
Add Stylish Flash Clock6
- If you want to add this Clock,then Copy and paste the below code
Add Stylish Flash Clock#
- If you want to add this Clock,then Copy and paste the below code
Add Stylish Flash Clock 7
- If you want to add this Clock,then Copy and paste the below code
Add Stylish Flash Clock 8
- If you want to add this Clock,then Copy and paste the below code
Add Stylish Flash Clock 9
- If you want to add this Clock,then Copy and paste the below code
Add Stylish Flash Clock 10
- If you want to add this Clock,then Copy and paste the below code
Add Stylish Flash Clock@
- If you want to add this Clock,then Copy and paste the below code
Add a Static Clock
Step 2:
- Copy and Paste the CSS code below after the code of clock.
With this tutorial you have got a Beautiful Clock.
- Then click on Save.
If you feel any confusion or doubt then please do comment.Wednesday, February 8, 2012
Add Flying Letters below Mouse Pointer Animation
How to setup flying letters below mouse pointer.This a simple article that Spice your Blog.After inserting this Code,When you move mouse over your Blog, you will see that Letters you SET in the below code will flying like a Animation.Install Flying Letters Below Mouse Widget
Make sure you had Backed up your Template(How To BackUp Template?)
- Sign In to your Blogger Account
- Go to Design->Edit HTML
- Find (Find Easily Using Ctrl+F) and Copy and Paste the below Code
- Save it,its all.....you are almost done.
Subscribe to: Posts (Atom)