Tuesday, January 31, 2012

Make Fake call to friends...And Keep disturbing. . . . . Techlove

Friends.. Here i give the site link to make Wrong flood call to your friend or Enenmies.

Go here And you can see the page.. In there you can see the box as belows.

In there you can give the friend or enemy number and click the call button. Then your friend will get the flood calls from unknown number. Enjoy yourself...

                                                 (Techlove)

Easy trick to hide folders from desktop .!.!.! Techlove

  •  Create folder on Desktop. (for ex. i have created folder Anand)

Right click on folder
  • --> Click Properties
  • --> Choose customize
  • --> Select change Icon


Now select the blank icon shown in the above and click OK. And your job is done now
For your Safety u can give the Folder name in Single letter.
( Techlove PC tricks)

Send colorful text message on facebook chat ! ! !

Hello friends.. Today i come here with new cool trick.. :)
This is helps to make your facebook chat colorful. yes.. u can do it. But every letter you have to type or paste the following codes while chatting
Send colorful text message on facebook chat
Use this below codes while chatting...........

[[107015582669715]] = A  [[116067591741123]] = B
[[115602405121532]] = C [[112542438763744]] = D
[[115430438474268]] = E [[109225112442557]] = F
[[111532845537326]] = G [[111...356865552629]] = H
[[109294689102123]] = I [[126362660720793]] = J 
[[116651741681944]] = K [[115807951764667]] = L 
[[106596672714242]] = M [[108634132504932]] = N 
[[116564658357124]] = O [[111669128857397]] = P 
[[107061805996548]] = Q [[106699962703083]] = R 
[[115927268419031]] = S [[112669162092780]] = T
[[108983579135532]] = U [[107023745999320]] = V 
[[106678406038354]] = W [[116740548336581]]=X

Monday, January 30, 2012

Learn to code with Codecademy

If you are looking for a career in the computer world you should consider learning coding. You can learn the basics of HTML very easily online but there are enough free and interactive learning center for coding on JavaScript which are very important for designers. There might not be enough but there are some; and one of the best I have found online is Codecademy.


Codecademy has a instructor and interactive to make the learning environment very easily. You can just use free registration and track your progress with it to keep you encouraged. If you choose to you can also learn with your friends. It will teach you the basics of java script and show you the path to designing website. This is a very amazing tool that you shouldn't miss if you don't know JavaScript. With the friendly virtual instructor and learning with friends can help you learn more and faster. I would definitely recommend this tool for beginners. So what are you waiting for? Go check it out at http://www.codecademy.com and good luck on your learning.


Awesome Rainbow animation Link Widget for Blogger

This is a simple Blogger Blog Trick,Changing the color of Link when Mouse over it.7 colors are changing like animation when hover the link.
Follow the simple steps below..


If you are a beginner in HTML editing,Use our 1 Click Widget Below(Click Add to Blogger Button below)


Install Rainbow Animation Hover Effect manually.

Note:Remember that Back up your Template First.(How to Backup Template)

  • Sign In to you Blogger Account.
  • Go to Design->Edit HTML
  • Find section and Place the below code inside it.


  • Save It and Enjoy. . . !

I think you enjoyed this post.Surely you will get excited after using this widget.

Sunday, January 29, 2012

Find Your Girlfriend or Boyfriend Cheating You Or Not

Ever wondered who your friend secretly likes? Is your girlfriend or boyfriend really true to you?\

Crushbits offering you to find out the answers of these question

How does it work?
You have to send an email or Instant Messenger or share on the facebook about a love calculator. In the email or IM Message, you have to include a customized link to our "CrushBit" Love Calculator.
Now, the exciting part! At the "CrushBit" webpage, your friend will be told to enter the names of his/her crushes so that we can make some predictions. As soon as your friend fills in his/her crush list, the names would automatically be mailed to you!

Click here to create a account in Crushbits

How To View Facebook Profiles Without Timeline

Hi guys Facebook introduced new timeline for there users. Some of them get interested with the timeline and some other disappointed with new timeline.

 Here iam posting this trick for the disappointed guys

Method 1

 Use Internet explorer 7 is the simple way. Facebook timeline is not supporting in Internet Explorer.


Method 2

 If you are a Mozilla user click here to download an add-on

 How this add-on works?

After installing this add-on restart the browser and go to tools now you can find a menu user agent switcher and select internet explorer 7 and go to the facebook

Done!


Get Updates in your facebook

Facebook New Chat Tricks 2012

Facebook funny chat tricks


Robot In Chat

 Type  :|] and press enter see the magic

 Shark in Chat

Type (^^^) and press enter


Facebook chat emote for weird guy\'s face!
Weird guy’s face: :putnam:


new facebook penguin emoticon
NEW Penguin emoticon: <(")
new facebook 42 emoticon
NEW 42 Red emoticon: :42:Thank you


Get Updates in your facebook

Saturday, January 28, 2012

Airtel free gprs on operamini with super fast speed 2012 - Techlove

Airtel free gprs operamini edited version works back with 3g speed.


To download..click here..

                                 ( Techlove   free Gprs tricks )

Findout Alternate sites for existing one. . . Techlove

Sometimes we are getting bored with the use of same sites for some specific use. now a days for any one purpose there are many sites available,

By using this http://www.similarsitesearch.com we can get the hundreds of its alternative sites details. from that we can choose our alternative for existing one. :)

Reasons why I would leave your blog

Photo credit: anitapatterson from morguefile.com
To 'secret' to blogging traffic is to create a environment so that your reader can't leave you. It's better to have 10 returning visitors to your blog than 100 'peace out' visitors. There are some main reason and mistake done by new bloggers that makes most of your visitor to say good-bye. If you want to be a serious blogger you should start thinking about them rather than yourself. Here is my list on why I would leave your site/blog.


Unclear content


If you are writing about something you should know what your are writing on, don't act professional on something you don't know. The main element of a blog is it's content. You have to fix this before anything else. Make your content clear, right on point, easily understandable and fresh. And of course original. If your information is wrong or content is unclear it creates a huge negative impression on your reader which is almost impossible to delete with every cool design and offers you have for them. and make him/her click the back button.


Too much eye catching


If you have the right content you should start worry about your template and widget. Eye catching is important but it has to be professional. Some template are very poorly designed and completely unrelated to what readers are reading. Unless it's a personal blog your readers would be happy to hear the loud auto-play of your favorite song. Don't use too much gif/ flashy content, mouse effects or any other funky script that would make you visitors ask-"where's the bathroom?"


Advertising hammer


Well you heard somewhere online that you can also make money by blogging so you signed up for all the advertising sites. Since nobody seems to click on them you put a load of them, some pops up, some starts talking, some jumps on the screen and many other extra ways to earn some extra. If you think that's a right method think why your reader would come to your site, for your content. And if they can't get the information they wouldn't be interested on what is going on around and just click the close button. Limit your ads and if you have right content and template you will start get more clicks on your ad than hammering them on the head before.


Needy baby


"Pay 2 dollars to read the article on secrete to be cool"-sounds great deal right? Here's another one -"Register To view the article" or you can also use "Finish the surveys to see the article"to make your visitor run away. Don't expect too much from visitor, each one will not give you 10,000 dollar for you blog. Since there are billions of article on almost every topic online it's your job to keep your reader to you, they can find billions of the same article online, so if you find one don't ask for too many things right after they enter the door.


Randomness


Unless it's a personal blog, when people looks for a certain information they expect your blog to be on the same topic. Even if the reader finds one of your article helpful he wouldn't come back because he/she doesn't know if your future post will be on the same topic your client need information in or interested. It's important to keep your blog in one certain topic. If you get one visitor for one of the post you will get a returning visitor who will like your future posts. So don't make your blog random because it's only good for stalkers.


I would leave your site/blog for mainly because of these reason. I didn't mention some obvious reasons black hat techniques and spamming, cookies, malware etc. Try avoiding the things I have talked about to gain trust as a new blogger and get you readers to follow your blog. What are some of the reason you would leave a site/blog tell us in the comment below.

Numbered Page Navigation For Blogger New Script

Today we will see how to add a nice page number navigation hack blogger. The default navigation links (i.e Older Posts) is not the friendly visitor if you are having a lot of jobs and bloggers readers.Few has some problems with the above script navigation page. Now here is a completely new script and work for numbered page navigation (i.e. Panigation) for Blogger. The paging widget for blogger it easy for the visitor. It is a must have for any new blogs.This new script allows you to add numbered page navigation to blogger/ blogspot blog with page numbers starting(1, 2, 3, 4 ….) like those of a book.


Add Numbered Page Navigation Widget With DIfferent Styles For Blogger / Blogspot


Page navigation widget for blogger is most popular widget, and most bloggers are using this. because these players are only provided in the wordpress blogs hosted or blogs.But now his trick has been made ​​available to bloggers is also here that I am giving this Page Navigation Widget with different styles and options for full customization


How To Install This Widget On Blogger :-

Customize the Given Options and Click on Generate button
Click Add to Blogger button to add this widget on your Blog


Stylish Numbered Page Navigation Widget with Colored Styles For Blogger


Numbered Page Navigation Widget is a JavaScript hack for blogger to easily navigate blogger pages. In this post i am giving stylish navigation with different colorful styles.

An error was found in some blogs and it is also fixed in this widget.
eg.hiding at top


How To Install This Widget On Blogger :-


  1. Click the below Button
  2. Customize the Options given in Widget form
  3. Click on "Generate" Button
  4. Finally click On "Add To Blogger" Button


How to Add Numbered Page Navigation Widget for Blogger / Blogspot


Page navigation is awesome widget that allows navigation of page number to the visitors. You might have seen numbered page navigation in many WordPress blogs. It is simple JavaScript that allows your older posts, new posts and links to the house numbers. Have you seen older posts, new messages and links at home bored.


How To Add Numbered Page Navigation Widget to Blogger Blog?

I am giving best customizing options to this widget

Note:-Choose colors for your convenience you feel good.

1.Customize Options in Widget Form
2.Click on Generate Button
3.Then finally Click on Add to Blogger Button to add as a Widget


Many thanks to Harish for making this code , Some Stylings and PageNavi Script by Abu Farhan and I just tested and modified to work on blogger

Awesome Random Posts Widget for blogger Blog

random posts widget
Random Posts widget is an awesome widget for your Blogger Blog.Most important feature of this widget is it lets your Blog visitors to surf more blog posts in your blog.Surely it increases your Blog's internal links that lets your blog higher traffic.
Its let your users to spend more time in your Blog.


Install Random posts widget

Make sure you are Sign In to your Blogger Account.

If you are a beginner in Blogger Editing ,use our one click Widget
  • Click the below Add to Blogger Button to install

Manually Add Random posts Widget

  • Sign In to your Blogger Account.
  • Go to Design->Page Elements
  • Click on Add Gadget and look for HTML/Javascript take it
  • Give the title as you need(eg:Random Posts)
  • Copy and paste the below code to the content section


Click on Save and its Done...If you have any doubts don't hesitate to ask.Please Comment.
I hope you had enjoyed this post.Leave Comments...

Friday, January 27, 2012

Google is changing it's Privacy Policy

If you live online almost anything you use is provided by google. With so many products such as Google chrome, Google Adsense, Google reader, Google Books, YouTube, Google Map, Google search and many other service each contains a different privacy policy and terms and condition. Now Google changing the theme to create one and easy Privacy policy to make Google experience even better.
Image and video hosting by TinyPic
The new privacy policy  was written for all the Google product and in a simpler way to improve the experience and understanding. If you want to use Google plus after the update you have to follow the new privacy policy and terms and condition. This will finally be update on March 1, 2012. So know your privacy and terms and condition you have to use after March 1 now at http://www.google.com.my/intl/en/policies/

Or go directly to 
(note: This might be different on your region)

Source: http://www.google.com.my/intl/en/policies

Beautiful Page Navigation for Blogger Blog


page navigation for blogger
Blogger Page Navigation is an awesome trick to navigate your Blogger Blog Pages.It allows your users to Navigate Blog pages like Book,By using this your blog visitors can easily go to an appropriate page.By default Blogger allows Older Posts and Newer Posts link to Navigate between Blog pages.It is very difficult for your users to navigate deeper into your Blog's Posts, so the Page Navigation helps us to solve this problem.
 Let's see how to install it.Follow the steps below.

1.How to install Page Navigation Widget

  • Log In to your Blogger Account
  • Go to Design-> Page Elements(Shown in the Picture)
  • Click on Add Gadget (anyone) and look for HTML/Javascript take it.
  • Leave the Title as Blank(as shown in the figure)
  • Copy and paste the below code in it.


you can change Red Highlighted texts when you need. pageCount=7;  determines how many Blog posts in each pages. you want to display in each pages.(Note:if you change this value '7' goto Settings->Formatting and change value of Show at most as you given in PageCount)
And displayPageNum=5 determines how many additional Page Navigation numbers display on the page.
  • Click on save,You are almost clear.
  • Then Change the position of the Widget ,place under the Blog posts.(shown in the figure)
  •  
  • Done..your blog had a page navigation bar.
The Page Navigation had been developed by Muhammed Rias and it was a good presentation.There are some bugs in that and Abu Farhan had solved it.Give them a big thanks for giving us a Beautiful Page Navigation Solution.

Thursday, January 26, 2012

Google+ is now open for teens

Teen run the internet. A social network without teen = fail. So finally the best and the latest social media everyone talking about is open for teens. 


Many teens been waiting for this for pretty long time now to get into this social media crowed. Since Google was in beta and still working on privacy settings it was closed for people under 18. Many teens got banned trying to get into Google plus. But to end all the drama Google plus is finally open to teen.
So, yay for teens and concerns for Facebook. Let's see what's waiting in the future for Facebook/Google plus. If you haven't registered already, go do so at https://plus.google.com

Money making tips for new blogger

For blogger who thinks blog = money, you are ...right! You can start earning money from your blog from your very first day. I will talk about one advertising program you can use right now to start earning from your blog. When you have a audience, the main focus for them is your content. And selling sidebar ads can be really hard job for new bloggers. So it is better to start with what your reader will actually care about. Yes, I am trying to to get the point on in-text ads.Today I will show you a affiliate in text program that I have been using from the beginning- Infolinks.


What is Infolink?


Simply Infolinks are in text ads. It behave link normal link from your website and when you mouse hoover it it shows the detail information of the link, if the viewer choose to check the link out and click on it you get paid. As you can see from the picture below


Why Infolinks?


  • Infolinks doesn't require you to give personal information
  • Infolinks doesn't have any minimum requirement- so anyone can join this programm
  • Infolinks is highly customizable to match your templete
  • Infolinks gives you the 70% of the revenue- the highest on the internet
  • Infolinks needs only one minute of your time to set up the ad on your blog
  • It also give yo options such as tag clouds, related tag, search wages other than in text ads for you to boost your earnings
  • Infolinks payout methods are Paypal, ACH, Bank Wire
  • Choose payout method whenever you want
  • Infolinks pays you monthly
As the best in-text ad there are many other reasons why you should and can join Infolinks to start earning today. What are you waiting for go register at: http://www.infolinks.com

Use Search Bar to Find a code in Blogger

find code in blogger
This article is very useful for Blogger beginners.This is a tutorial about how to find specific code in  webPages/Blogs/Websites.You may see many Blogger Tutorials on internet for the purpose of designing or to add gadgets to your blog,for eg: if you need to add some meta tags  inside section.
 You go to
Design->Edit HTML
look for

find and place meta tags inside it. But,

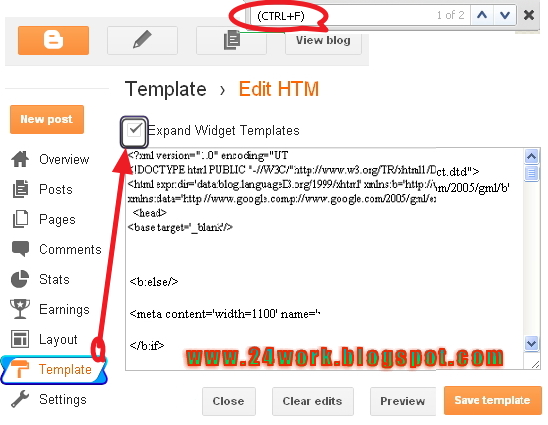
It is not easy to find a code manually.So Use Ctrl + F to find.

Look the below picture
 

  • Hold Ctrl on the keyboard and press F,(Ctrl+F is the shortcut to reach Find Bar in almost all browsers)
  • A Find Bar will display, Type the code you want to search.
  • At once that code will highlight on the Page/Blog
  • Then you can edit/delete/modify highlighted code.
Please Leave Comments

Create an Official Google plus Page to drive traffic

Google launched Google pages for Google plus.It is a business solution for promoting products,blogs,news,events etc.. to your fans.Another important feature is it will increase your blog's traffic.Now i am saying about how to create an official Google+ Fan Page for your Blog.You can share your blog posts,events,photos etc to your Google Official plus fan page.It is almost similar to Facebook Fan Page.
Lets see how to create it.(Description with images)
Follow the instructions

Create official Google+ page

You must have a Google plus Account to create Fan page.

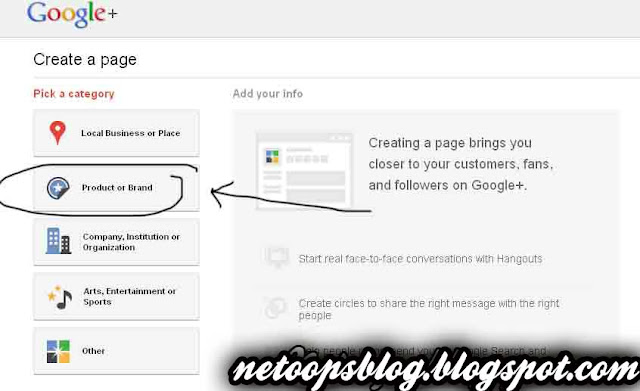
  • Sign In to your Google account and go to this LINK
  • Click on Product or Brand
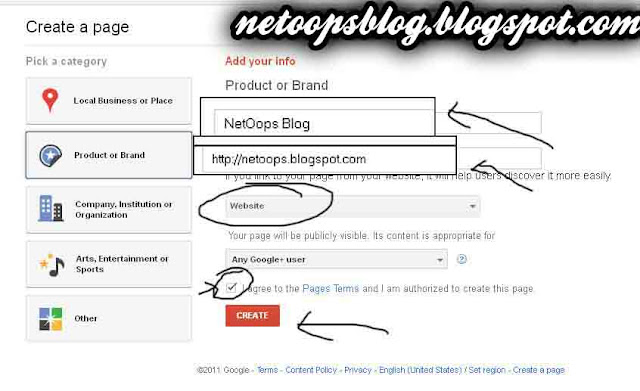
  • Give the name of page you need to create(Blog/Site Name)
  • Choose Website from the list
  • Make sure you check the box below it
  • Click on CREATE

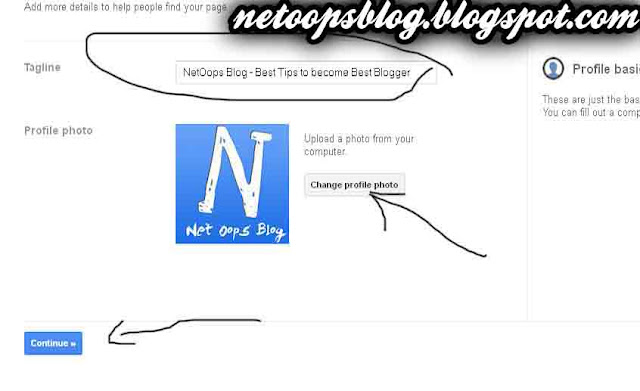
  •  The give your blog title and upload your Blog LOGO, If you have no LOGO for Blog click HERE
  • Click on Continue
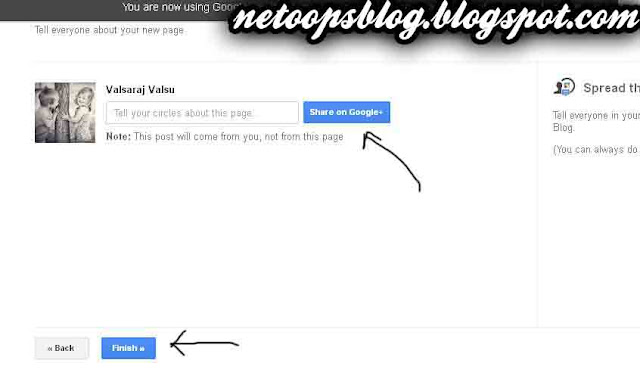
  • Page creation is almost finished.Now you can share your Google+ page by click on Share on Google+
  • Click on finish ..Done..your page has been created sucessfully.

How to add Google+ Badge to your Blog

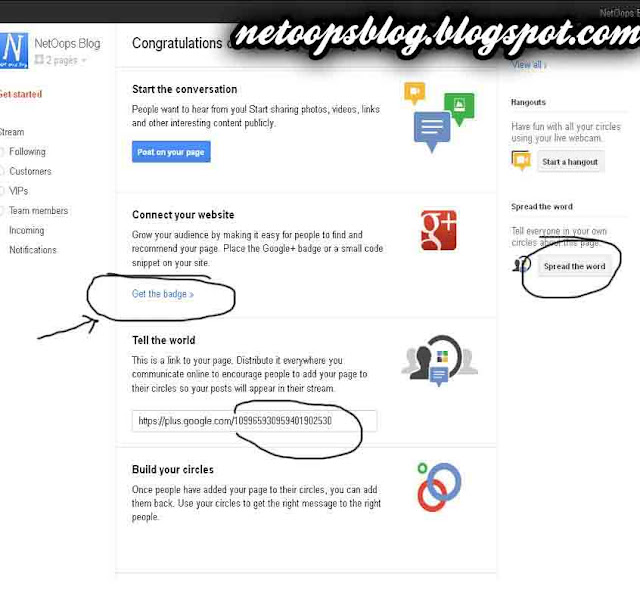
After finishing creating page ,you can see a button Get the Badge, Click it
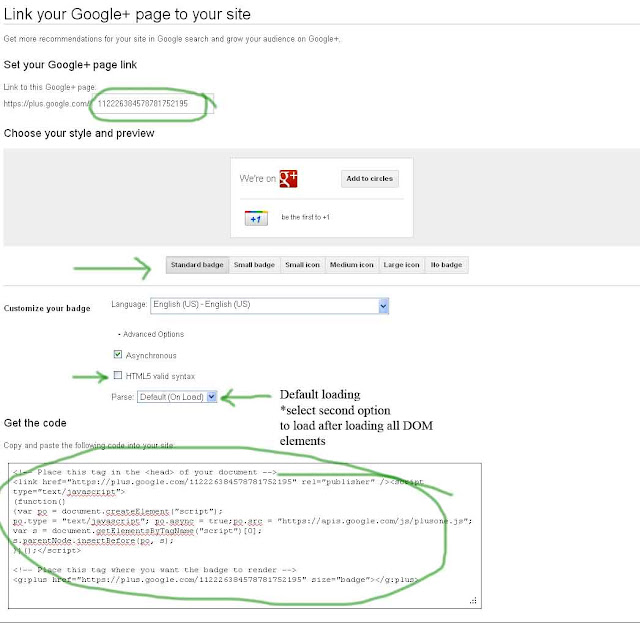
  • It will redirect to the page like following picture.
  • you can see your page link,you can share it.
  • Choose the style of your G+ badge
  • After that if you want check the box HTML5 valid syntax
  • Then Copy the code in  the text box
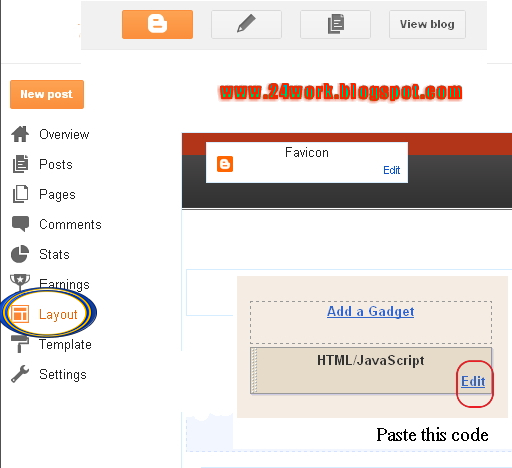
  • Go to your Blogger Dashboard
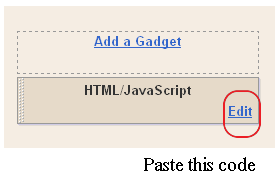
  • Select Design->Page Elements click on Add Gadget
  • A pop up window will appear look it carefully and find HTML/JavaScript
  • Enter gadget title(eg:Share in Google Plus) and Paste the code on the content textbox
  • Click on SAVE..,Done..

Wednesday, January 25, 2012

Add Flash Twitter Follow Me Buttons to Blogger Blogs / Websites

Twitter is a social networking sites popular in the world of bloggers to promote their blogs. So here I am very cool Twitter Blogger widget, now it shows me how to add flash buttons to your twitter blogs and websites. These are the widgets based on Flash animations and have some nice effects.These buttons can help Twitter Flash Spice up your blogs, Webssites and can help you gain more followers on Twitter. These are designed and developed by twitterflash.net. I'm taking all the 15 types of one-click install to your blog.


How to Install Flash Animated Twitter Follow Me Widget To Blogger / Blog / Websites


I have to write two set of instructions for each steps, as some of you are using the default layout, and some of you are using the new layout. So, let's see how to install this cool widget in your blog..

Step 1:


If you're using the old Blogger interface: Go to Dashboard - Design - Page Elements - Add a Gadget.


Add a Gadget of HTML/JavaScript type.


If you're using the new Blogger interface: Go to Dashboard - Layout - Add a Gadget


2.Click on 'Add a Gadget' on the sidebar.

3.Select 'HTML/Javascript' and add the one of code given below

4. Now Click On Save 'JavaScript' You are done.


Blogger Widgetsusername=rohul786">Blogger Widgetsusername=rohul786">


And now click Save


How to Install Flash Twitter Follow Me Buttons on Your Blog?


1. Choose Any Flash Follow Me Button As You Want

2. Replace rohul786 With Your Twitter User Name

3. Customize Width And Height as You Need

4. Click on Generate Button and Finally Click on Add to Blogger Button to add this widget on your blog.


OR

5. Click on Get Code Button and Copy the code to use it.


Tuesday, January 24, 2012

Related Posts Widget For Blogger / Blogspot with jQuery

Related posts widget is very important for a blog, because it increases the number of page views and also help the visitor to view other posts related to blog. Now here is wonderful trick to display links to related posts beneath each posts. At their blogs today there are many types of related post widget, and related items thumbnail images using HTML, Java script, etc. .. Here I will show a method that is easy to show install.It only title jQuery.It related post widget will look like a picture below.


How To Add Related Posts Widget For Blogger


I have seen few who are showing the Related Posts Widget of posts below their posts. It’s also a good script placement which can increase your pageviews.

To add the code , just follow the above instructions.


I have to write two set of instructions for each steps, as some of you are using the default layout, and some of you are using the new layout.Backup your template before attempting this tutorial.

Step 1:


In old layout: Go to Dashboard - Design - Edit HTML - Expand Widget Templates.


In new layout: Go to Dashboard - Template - Edit Template HTML - Expand Widget Templates.


Now find (CTRL+F) this code in the template:


And immediately before it, paste this code:


<b:if cond='data:blog.pageType == "item"'>

Blogger Widgets<style type="text/css">

#related-posts {

float:center;

text-transform:none;

height:100%;

min-height:100%;

padding-top:5px;

padding-left:5px;

}

#related-posts .widget{

padding-left:6px;

margin-bottom:10px;


}

#related-posts .widget h2, #related-posts h2{

font-size: 1.6em;

font-weight: bold;

color: black;

font-family: Georgia, “Times New Roman”, Times, serif;

margin-bottom: 0.75em;

margin-top: 0em;

padding-top: 0em;

}

#related-posts a{

color:blue;

}

#related-posts a:hover{

color:blue;

}

#related-posts ul{

list-style-type:none;

margin:0 0 0px 0;

padding:0px;

text-decoration:bold;

font-size:15px;

text-color:#000000

}

#related-posts ul li{

background:transparent url(https://blogger.googleusercontent.com/img/b/R29vZ2xl/AVvXsEgQJzv-coNLeiW9THIk6QWXJYfzA4bIIga2N7vOKJDgRMT1s_iH-lzgCF5SR1fZBS1gbIh6ehmIpnOcLHDdxW8QZvVYAp4ERkHmamwjISAMzGnhFvqyOEZ78hp8LTefwe4iQ1cOlEjbzJI/s200/greentickbullet.png) no-repeat ;

display:block;

list-style-type:none;

margin-bottom: 13px;

padding-left: 30px;

padding-top:0px;}

style>


<script type='text/javascript'>

var relatedpoststitle="Related Posts";

script>

<script src='http://safir85.ucoz.com/24work-blogspot/related-posts/related-posts-for-blogger-24work.js' type='text/javascript'/>


b:if>


If you want to change the title of your widget you can edit this line of the above code


var relatedpoststitle="Related Posts";


If you want you can edit the blue and black colors present in this code


2.Now find this line of code


<div class='post-footer-line post-footer-line-1'/>


If you cant find it then try finding this one


<p class='post-footer-line post-footer-line-1'/>


Now immediately after any of these lines(whichever you could find) place this code snippet


<b:if cond='data:blog.pageType == "item"'>

<div id='related-posts'>

<b:loop values='data:post.labels' var='label'>

<b:if cond='data:label.isLast != "true"'>

b:if>

<b:if cond='data:blog.pageType == "item"'>

<script expr:src='"/feeds/posts/default/-/" + data:label.name + "?alt=json-in-script&callback=related_results_labels&max-results=6"' type='text/javascript'/>b:if>b:loop><a href='http://24work.blogspot.com'>Related Posts Widget for Blogger


And now click Save Template


Typical Usage #2

To show related links at the side column. copy this code into a new HTML/Javascript widget and place at the side in the page elements section.Again, If you already included jQuery into your blog. no need to do it again.

How to Install Related Posts Widget related links at the side column


I have to write two set of instructions for each steps, as some of you are using the default layout, and some of you are using the new layout. So, let's see how to install this cool widget in your blog..


Step 1:


If you're using the old Blogger interface: Go to Dashboard - Design - Page Elements - Add a Gadget.


Add a Gadget of HTML/JavaScript type.


If you're using the new Blogger interface: Go to Dashboard - Layout - Add a Gadget


2.Click on 'Add a Gadget' on the sidebar.

3.Select 'HTML/Javascript' and add the one of code given below

4. Now Click On Save 'JavaScript' You are done.


Blogger Widgets


And now click Save